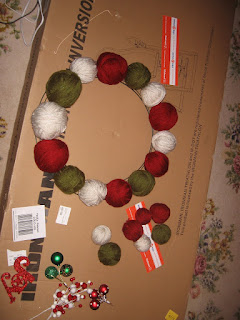


I made my first wreath a couple of months ago when I made a yarn ball wreath with Autumn colors. I fell in love! I knew right then and there that I would repeat at least the yarn ball wreath, but maybe venture into something new as well. Well, here is my Christmas themed yarn ball wreath for the living room and my gingerbread boy and girl wreath for the kitchen(pics will be coming soon!). I took pictures of the steps this time so it would be easy to duplicate.
Yarn Ball Wreath
1. Get your supplies! This is the fun (and dangerous) part! Head to the craft store and let the creative juices flow! I like the look of yarn ball wreaths, but I prefer to add more texture and "pop" to mine, so I look around for little embellishments. For the Christmas wreath, it was easy. I found little ornaments that would coordinate and some little pom pom things. Pick up a wire wreath frame as well (I used an 18 inch). Try not to get too distracted and to NOT buy the entire store!
2. Make the tin foil balls. So easy. They don't have to be perfect balls, just don't make them too tight (it helps to have a little give in the balls when putting the wreath together). Make them a variety of sizes from grapefruit size to a small plum size.
3. Start wrapping away. I grabbed my kiddos (ages 10 and 6) and we popped in Polar Express and wrapped while we watched. It made the time go faster (it does take a couple hours to wrap all the balls) and the kids were able to be involved in the craft. It was great!
4. Once they are all wrapped, take the larger ones and simply place them on the wire frame. This will give you an idea of how you want everything placed. There will be gaps, but they will be filled in later with the smaller balls and embellishments.
5. Start hot gluing! This seems so simple for some people, but for a novice crafter, this takes some doing. I burn my fingers, end up with glue all over things and have those annoying little stringy, spider-webby things everywhere. Seriously, is there a class on how to use this thing?! Anyway, I pour on the glue so I'm sure everything will stay put. As you glue, gently yet firmly push the the yarn balls into the frame and together. This is where it is beneficial to have a little give in your balls.
6. Lift the wreath up to eye level (or higher depending on where you want to hang it) and start evaluating where gaps need to be filled. This is when you get to put in the little ones and the embellishments. As you do this, it is very helpful to periodically hold the wreath up to look at it. It is a very different perspective.
7. Once you are happy with the placement of everything and it is all sufficiently glued, you can choose to add a ribbon by which to hang your beautiful creation. It could also do without the ribbon and simply hang on wreath hanger.
8. Step back and marvel at your craftiness! Sit down and enjoy a cup of coffee (or hot cocoa) and be amazed at what a talented little crafter you have become!
No comments:
Post a Comment